sewing for sissy maids

Chapter 3: How to draft the pattern for your maid's dress

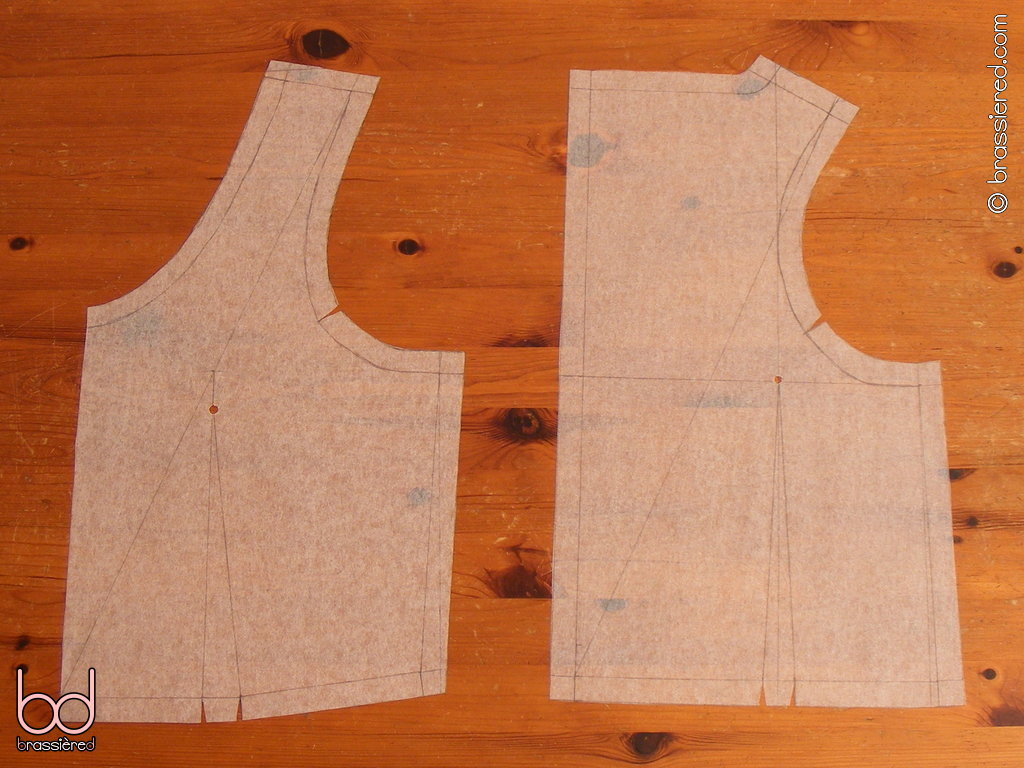
Drafting your maid's dress on paper

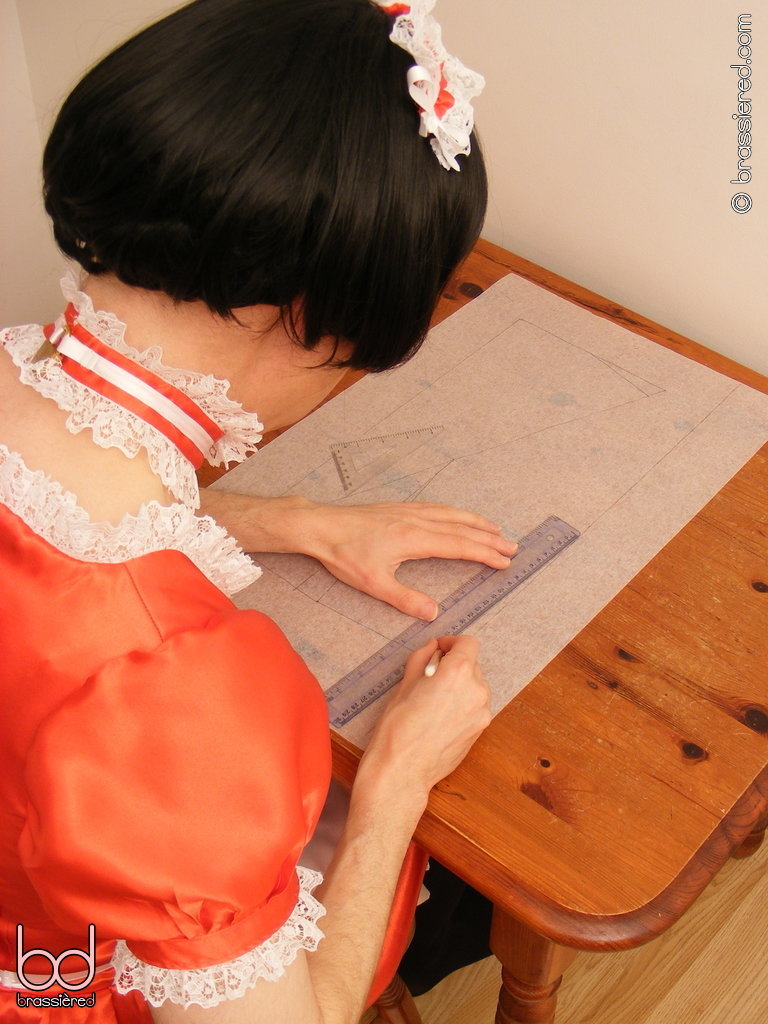
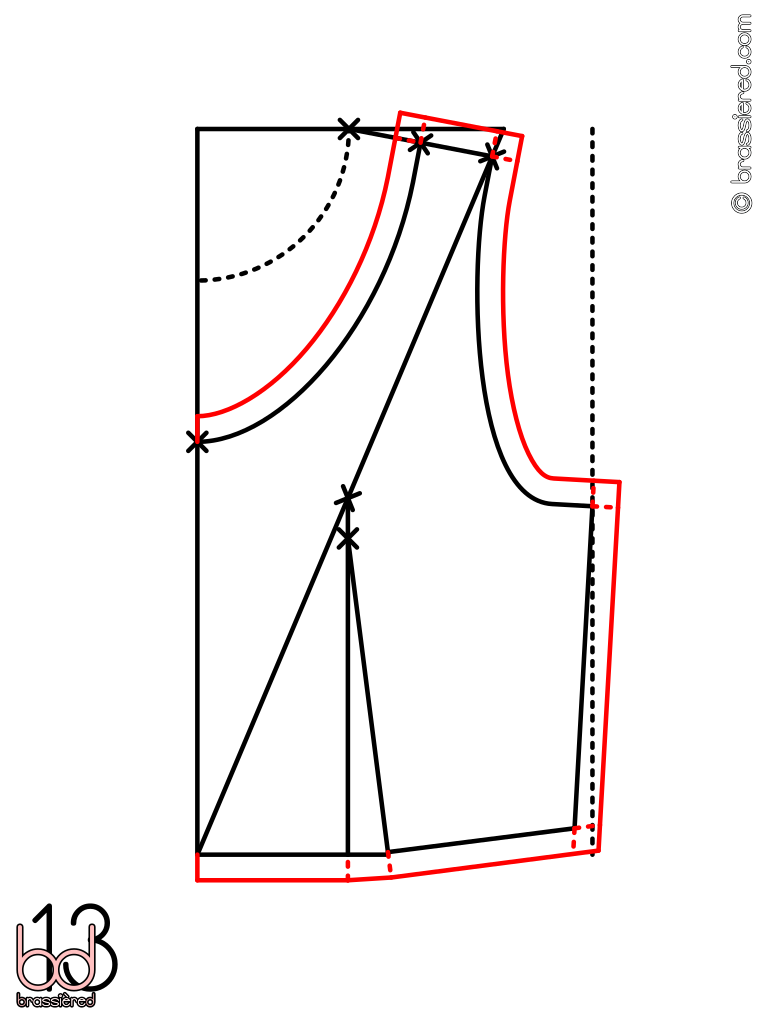
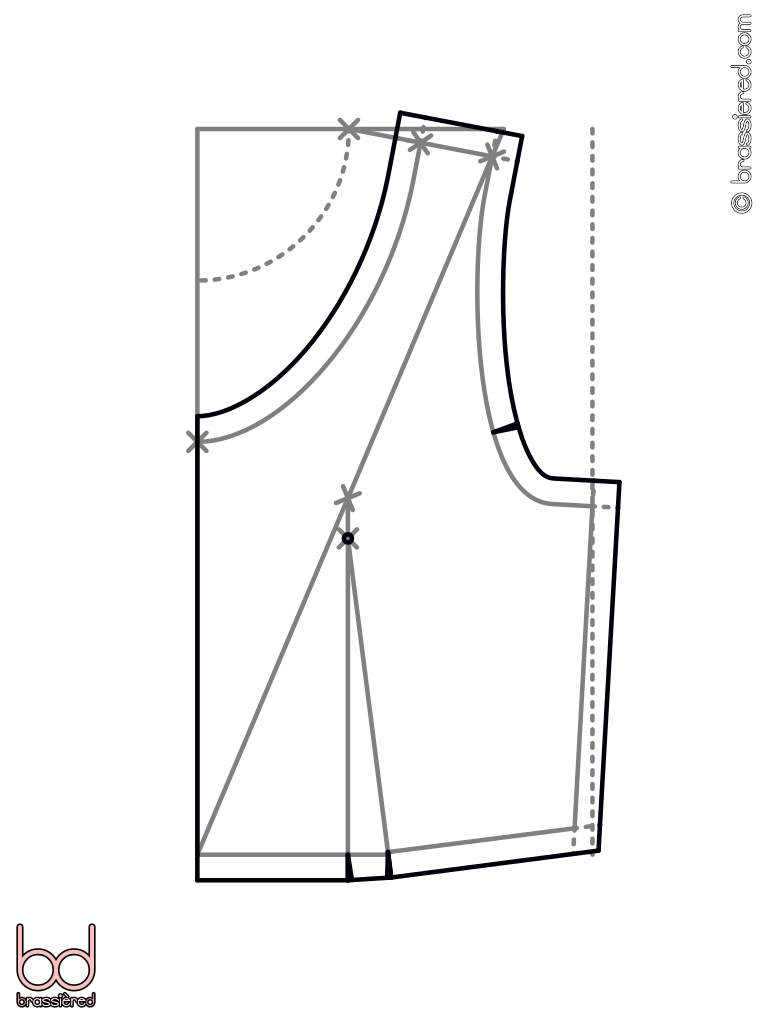
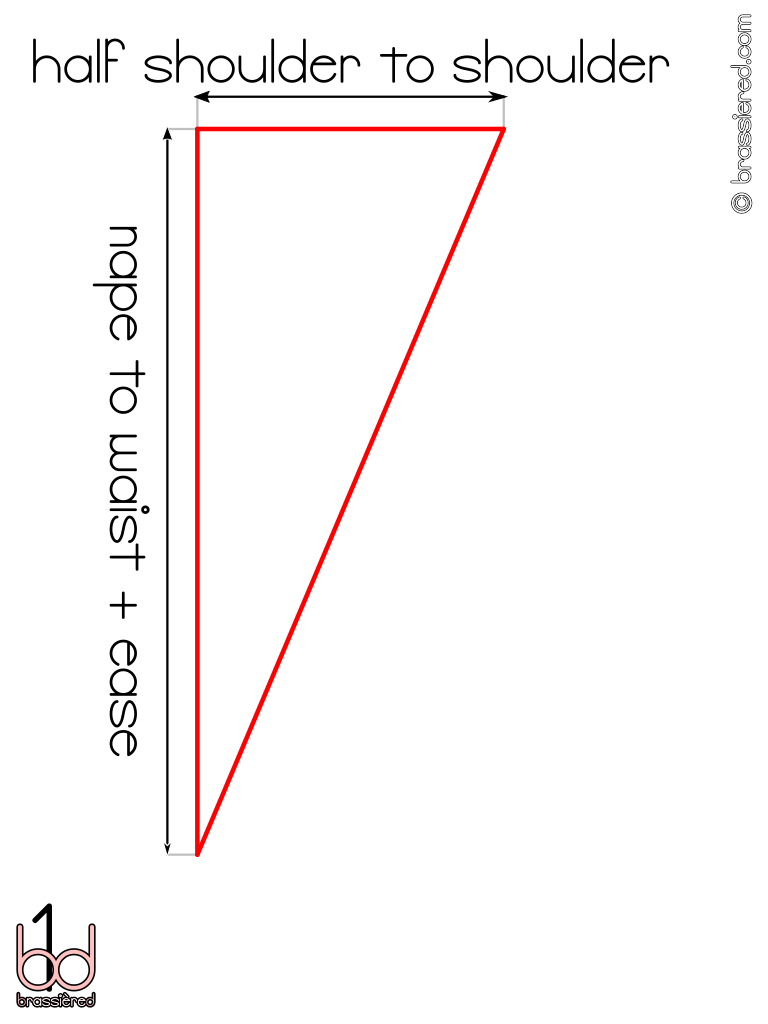
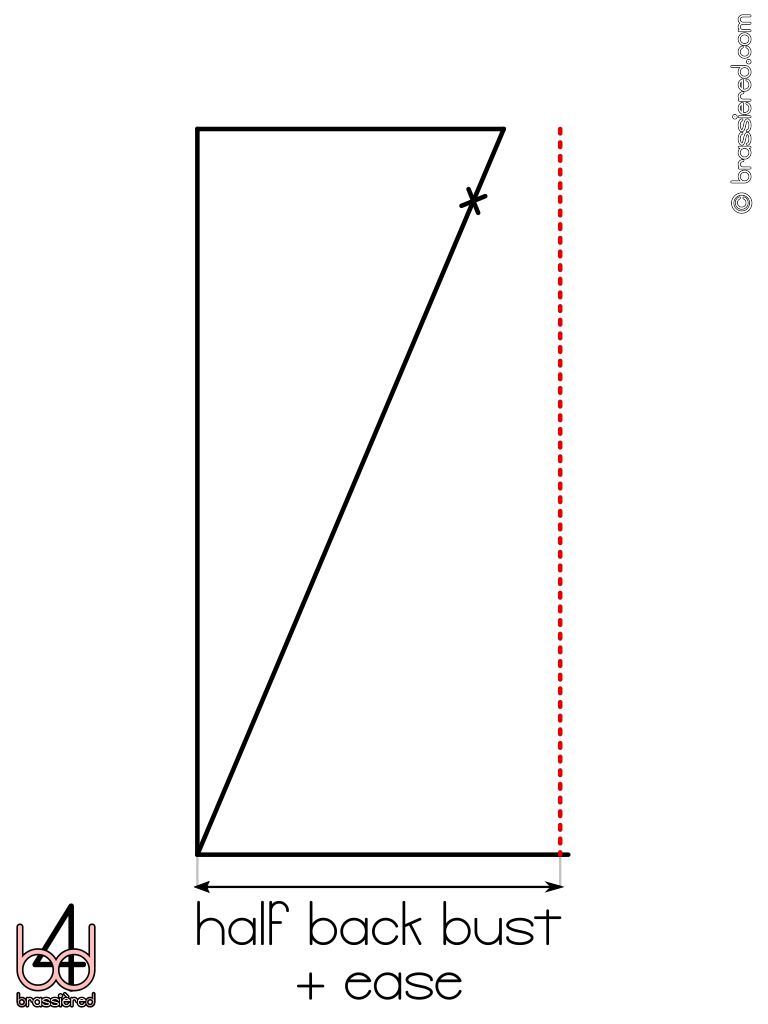
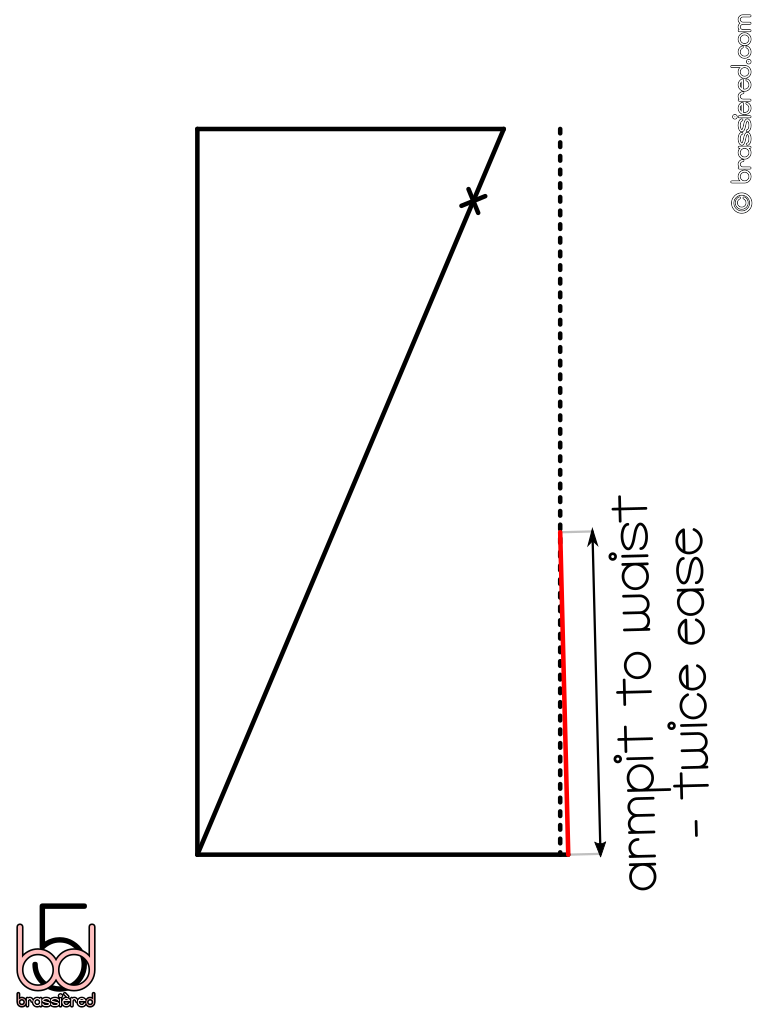
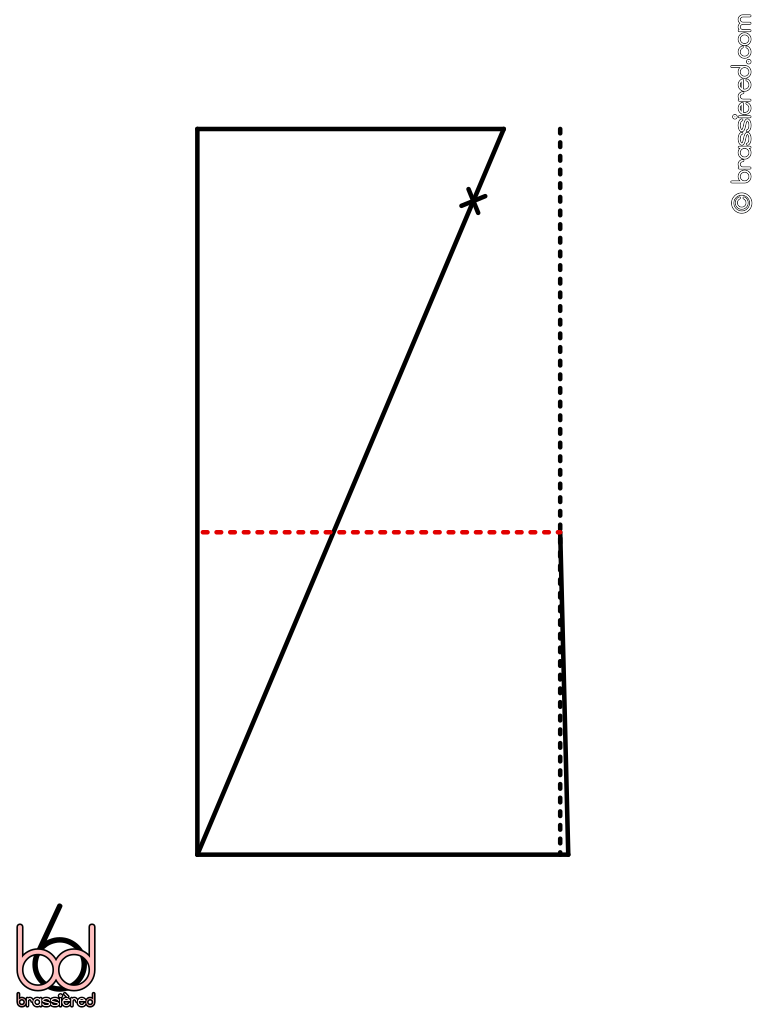
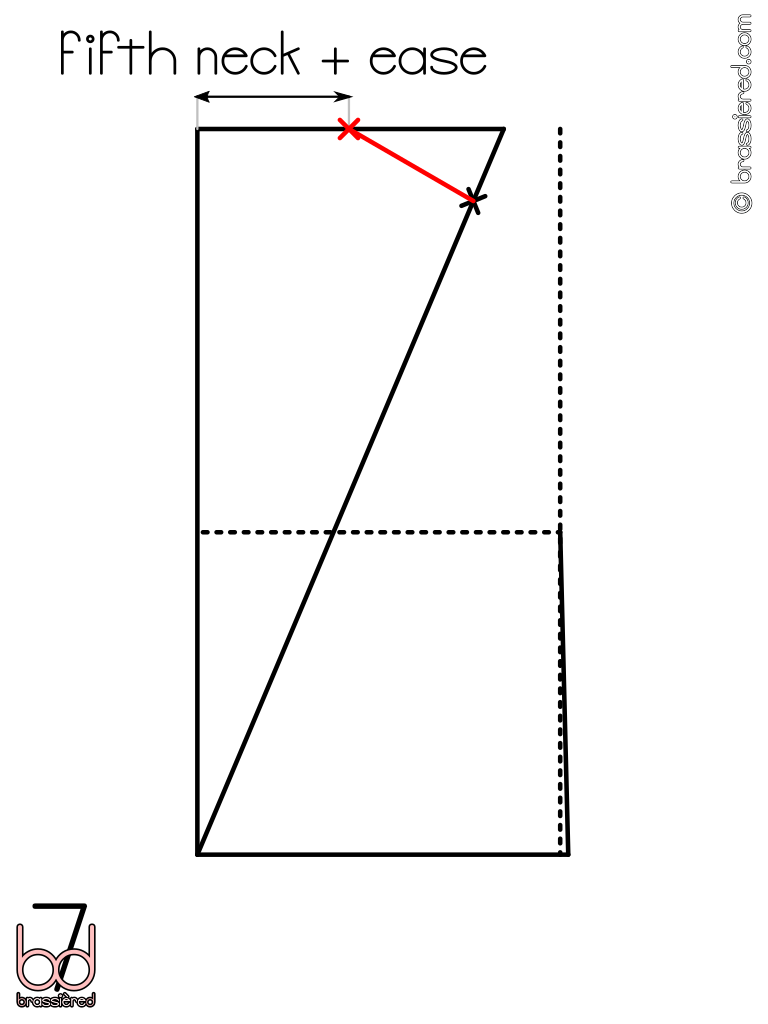
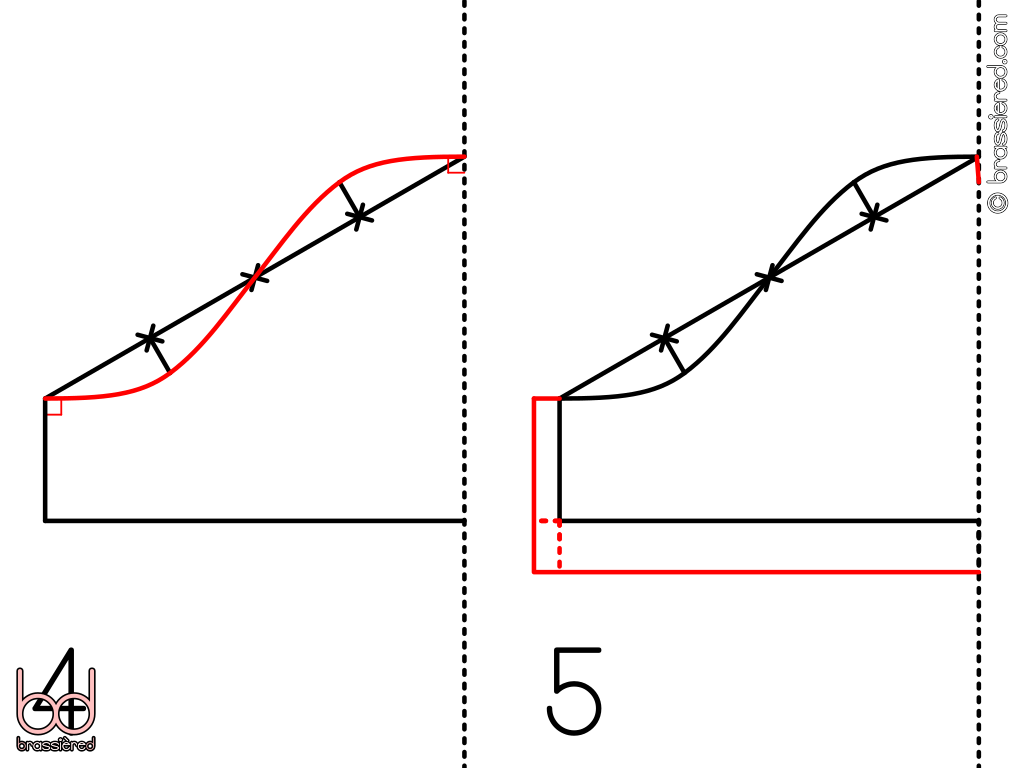
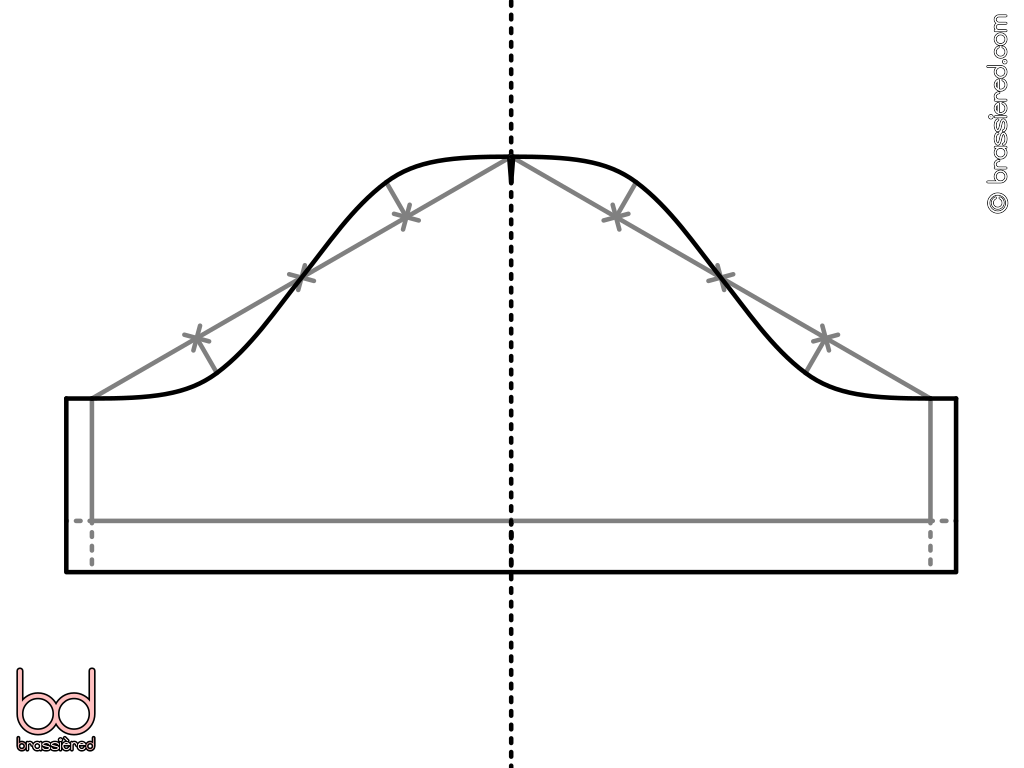
In the previous chapter, you took a series of measurements of your body. We're now going to turn these into a pattern - a template for the various parts of the dress and apron you're going to make. Although some of the pieces we require are simply rectangles of various sizes, others have a more sophisticated shape, so we'll be drawing them on paper before tracing them onto fabric.

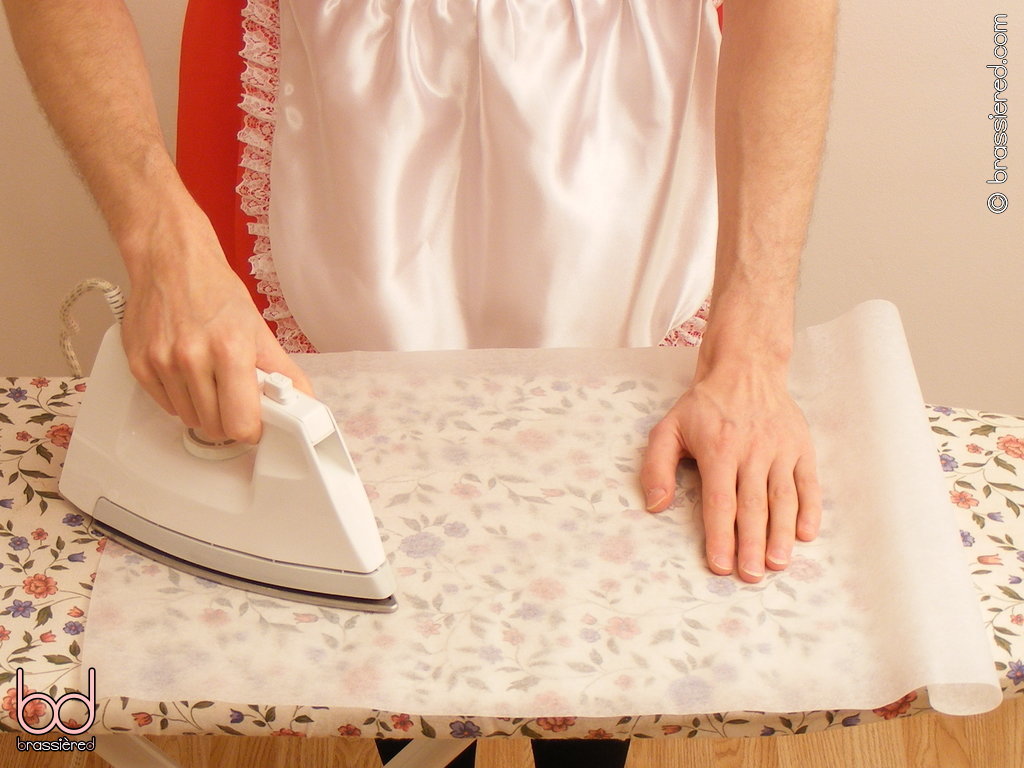
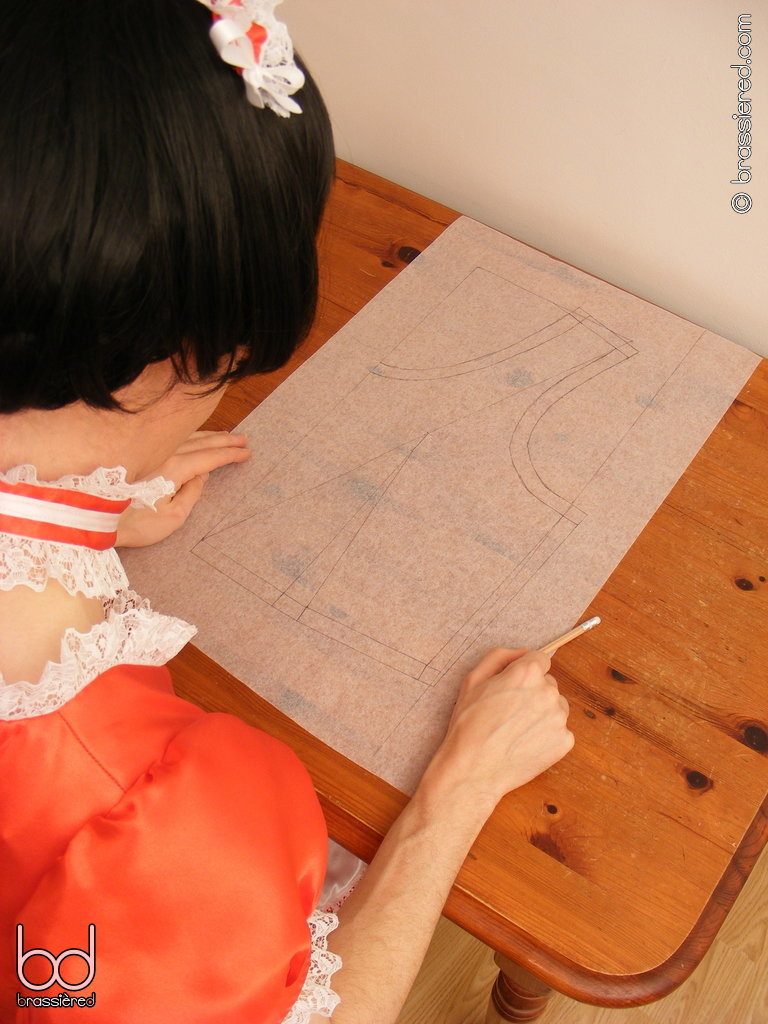
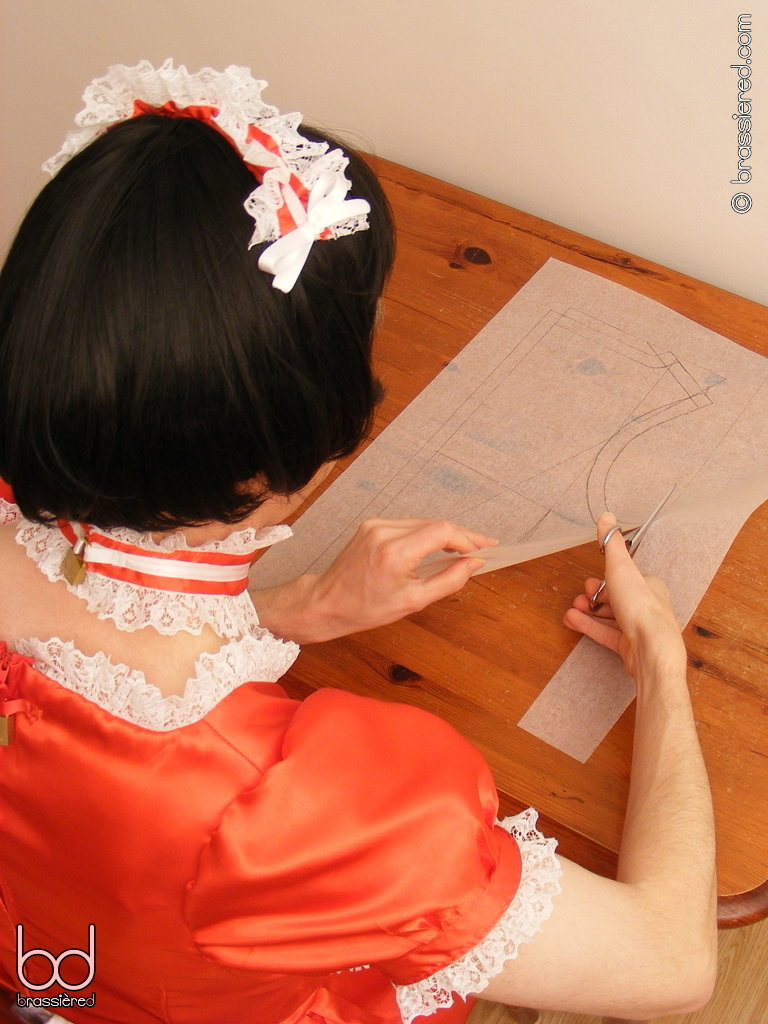
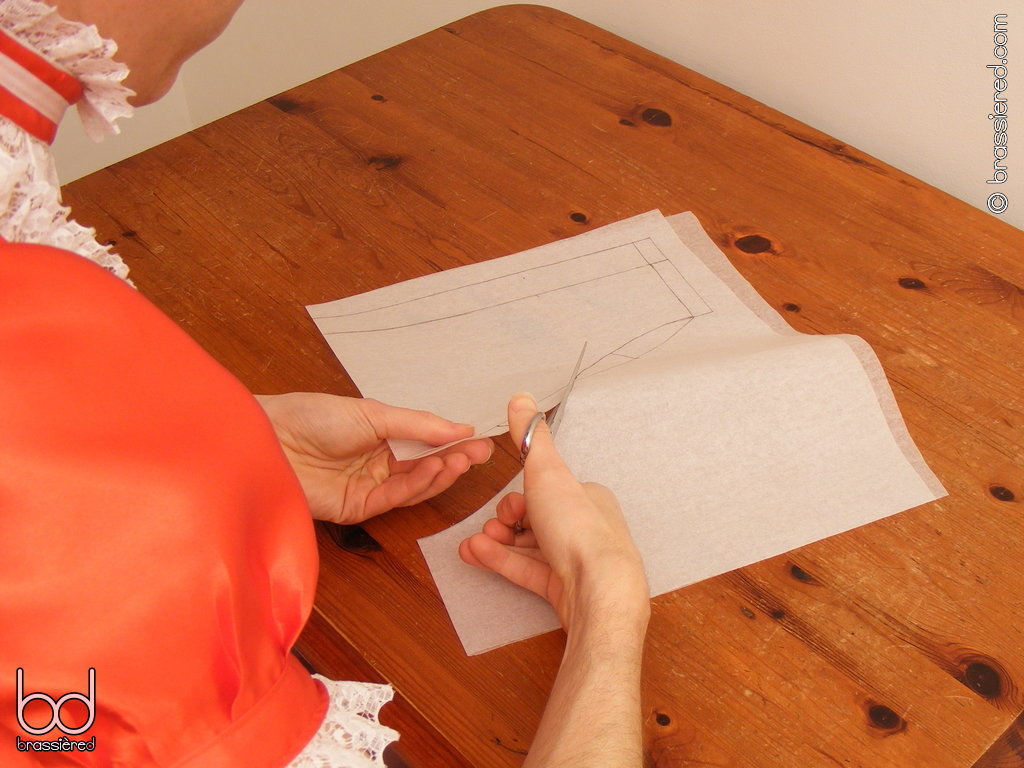
You can use regular paper for this purpose, sticking together several sheets if you don't have any of a suitable size. Ideally, you'll want an A2 sheet for each of the bodice pieces we'll be drafting, but this can be easily made from four sheets of A4. Alternatively, a length of baking parchment works well - not only can it be cut from the roll, but it pins well to fabric too. To remove its tendency to curl, simply give it a quick iron as my husband demonstrates in Figure 3.1. He's wearing the first of several maid's dresses he made for this book, a bright red satin of the same design we're about to draft.

Figure 3.1: A quick iron removes the curl from baking parchment...
Figure 3.2: ...before my husband starts drafting his bodice pattern

Drafting the bodice front

Drafting the bodice front steps 1 and 2
  1. Begin by drawing a right-angled triangle whose horizontal side is half your shoulder to shoulder measurement, and whose vertical side is your nape to waist measurement plus ease. You can imagine the sides of this triangle running down from the hollow of your neck to your belly button, and across from the hollow of your neck to slightly above your right shoulder. Allow yourself a margin on the paper, as we'll be adding to the sides later.

  2. From the bottom corner of the triangle, measure up the diagonal by your front shoulder to waist measurement and mark a cross. This corresponds with the tip of your right shoulder. From this cross, measure back down the diagonal by your shoulder to bust measurement and mark a second cross. This second cross corresponds approximately with the apex of your right breast.

Drafting the bodice front steps 3 and 4
  1. Draw a line vertically down from the second cross, making a smaller right-angled triangle by joining it with a horizontal line to the bottommost point of the first triangle. Make a note of the length of the horizontal side of this triangle as the front centre to dart distance.

  2. Measure down from the second cross by your front dart drop, and mark a third cross. This is where the front dart of the bodice will come to a point. Continue the bottom of the smaller triangle across to the right by your front dart width - this is the gap for the front dart. We're cheating a little on the geometry here, but the angles involved allow mean there's not much of a difference between doing so and drawing the circle that we mathematically should.

Drafting the bodice front steps 5 and 6
  1. Measure straight down from the third cross, then draw a line of the same length from the third cross towards the end of the front dart - something that is easily achieved by sweeping your ruler through an arc. Having done so, draw another line at right angles to the first, the length of which should be a quarter of your waist circumference plus ease minus the front centre to dart distance. Once the dart is sewn, you can imagine this line and the horizontal line in step 3 coming together to run from your belly button across to the right side of your body - the total length being a quarter of the waist circumference plus ease. Indeed, if your front dart width is zero, you'll have just a straight line running across the bottom of the pattern.

  2. Draw a vertical guideline that's half your front bust measurement plus ease from the left of the pattern.

Drafting the bodice front steps 7 and 8
  1. From the end of the waist line, draw a line to the bust guideline, ensuring that its length is your armpit to waist measurement minus twice ease. This line corresponds to the side seam of the dress, running down from your right armpit to your waistline.

  2. Returning to the top of the large triangle, measure across from the right angle by a fifth of your neck circumference plus ease (one fifth is a multiplier found by trial and error to yield a reasonable result). Draw a circular guideline with this radius, centred on the right-angled corner. Because of the way fabric stretches, this circle corresponds to a very modest neckline - were you to use it, your dress would hug the hollow of your neck.

Drafting the bodice front steps 9 and 10
  1. Draw a line from the neck cross to the shoulder cross you marked in step 2. This line corresponds to the shoulder seam of the dress, and you can choose how much of it to use. To make things simple, divide it into two equal lengths, and mark a cross in the middle. Make a note of the distance between this middle cross and the shoulder cross as the shoulder length - we'll be using this when we draft the bodice back piece.

  2. From the bottom of the circular neck guideline, measure down by half your neck to bust measurement and mark a cross, which corresponds with a point midway towards your cleavage. Again, you can change this distance to affect the décolletage of your maid's dress - for a most provocative neckline, you might drop this as much as the full neck to bust measurement, whereas for something more modest, you would stick close to the circular guideline.

Drafting the bodice front steps 11 and 12
  1. Draw a smooth curve joining the middle shoulder cross and the cleavage cross, making sure the line meets those at its ends at right angles. This is half of the dress's front neckline.

  2. Draw a smooth curve joining the shoulder cross and the end of the side seam, again making sure that the line meets the others at right angles. This is front half of the dress's armhole, and completes the part of the pattern that you'll see on your body.

Drafting the bodice front steps 13 and 14
  1. In order to sew the pieces together, however, we need to allow a margin for seams. Add a border that's the width of your seam allowance around all but the left edge of the pattern - we don't need one here, because we'll mirror the pattern along this line when tracing our pieces. Cut along this border.

  2. Because we won't be cutting out the darts, we need some way of marking where they are. We'll do this by snipping small triangles from the edges of the pattern where the dart meets the seam allowance. Make another such mark a third of the way up the armhole (we'll use this to indicate where to start gathering the sleeves), and punch a hole at the point of the dart.

Figure 3.3: The finished bodice front pattern - in theory, and in practice

Drafting the bodice back

Drafting the bodice back steps 1 and 2
  1. Begin by drawing the same triangle you did for the bodice front, having a horizontal side that is half your shoulder to shoulder measurement, and a vertical side that is your nape to waist measurement plus ease. Again, allow yourself sufficient margin for seam allowances.

  2. From the bottom corner of the triangle, measure up the diagonal by your back shoulder to waist measurement and mark a cross. As before, this cross corresponds with the tip of your right shoulder, but this time, the vertical side of the triangle is following the length of your spine.

Drafting the bodice back steps 3 and 4
  1. From the bottom corner of the triangle, draw a horizontal line having a length that's a quarter of your waist circumference plus ease plus your back dart width. This line will run around your waist.

  2. Draw a vertical guideline that's half of your back bust measurement plus ease from the left of the pattern. In my husband's case, this line comes very close to the end of the one drawn in the previous step1. Nevertheless, they are different, as the angle in the next step will illustrate.


[1] Only when we came to putting together this chapter did he confess that he'd rounded up his waist measurement to make it easy to divide by four, something that I would have preferred to have caught before he'd made several uniforms to the same pattern. Coupled with his choice of dart width, that makes the angle in the next step acute rather than obtuse, but save for being slightly looser than I would have liked, the end result is perfectly reasonable. I mention my maid's mistake to illustrate just how forgiving the method we're using is, even if the lady of the house was less so

Drafting the bodice back steps 5 and 6
  1. From the end of the waist line, draw a line to the bust guideline, ensuring that its length is your armpit to waist measurement minus twice ease. As with the front of the bodice, this line corresponds to the side seam of the dress, running down from your right armpit to your waistline.

  2. Draw a horizontal guideline from the end of the side seam to the left of the pattern.

Drafting the bodice back steps 7 and 8
  1. Returning to the top of the large triangle, measure across from the right angle by a fifth of your neck circumference plus ease. Mark a cross here, and draw a line from this cross to the shoulder cross you marked in step 2. Once again, this line corresponds with the shoulder seam of the dress, but its slope and length are likely to be different than that of the bodice front.

  2. Because we'll be sewing them together, we need the length of the shoulder line on the back pattern to be the same as that on the front. Although we could add another dart here to achieve this, we'll keep things simple by measuring up from the shoulder cross by the shoulder length you took in step 9 of the bodice front. Mark another cross at this point, which may not be in the exact middle of the shoulder line because of the difference between your front and back bust.

Drafting the bodice back steps 9 and 10
  1. From the middle shoulder cross you marked in step 8, draw the neckline. This must meet the shoulder line and the left of the pattern at right angles, but should also curve quickly to become mostly horizontal if it is to sit high to allow the maid's dress to be locked. You can, of course, experiment with deeper curves here should you want a more daring back to your dress.

  2. Divide the full shoulder line into two equal parts, and from the middle, draw a vertical guideline down to the waistline. In my husband's case, the distance between the start of this line and the middle shoulder cross is minimal, but it would be more significant were you to draft a pattern with a longer or shorter shoulder length.

Drafting the bodice back steps 11 and 12
  1. From where this vertical guideline crosses the horizontal guideline you drew in step 6, draw a triangle with two equal sides that meet the waistline, the distance between which is your back dart width (skip this step if this is zero). This is the back dart, and points at the middle of your shoulder.

  2. As you did for the front of the bodice, draw a smooth curve joining the shoulder cross and the end of the side seam, again making sure that the line meets the others at right angles. This is back half of the dress's armhole. Note that, although coming close in places, this line does not follow either the diagonal of the large triangle or the horizontal guideline.

Drafting the bodice back steps 13 and 14
  1. As before, add a border that's the width of your seam allowance. This time, we need to do so on all of the edges, because the long side of the back piece will in due course be sewn to a zipper. Again, cut along this border.

  2. Mark the ends of the dart by snipping two small triangles, as well as another a third of the way up the armhole. Finally, punch a hole at the point of the dart.

Figure 3.4: The finished bodice back pattern - cut along the black lines

Drafting the sleeve

Drafting the sleeve step 1
  1. Begin by folding your paper in half vertically, with the crease on the right (marked by the dotted line in the diagram). This will mirror the sleeve piece.

    Draw a line horizontally from the crease, making its length seven eighths of your bicep circumference. As before, allow yourself an adequate margin. This line corresponds to the bottom of the sleeve, but is longer (when doubled) than you might naively expect in order to allow for gathering. Seven eighths is a multiplier found by trial and error to yield a reasonable result.

    Next, draw a line up from the left of the bottom line, making its length your underarm length. This line corresponds to the armpit seam.

    Then, draw a line up from the right of the bottom line, making its length your overarm length plus puff - an additional 5cm / 2” to make the sleeve puffy, rather than simply follow your shoulder. This line corresponds to the middle of the sleeve, and will run down the side of your arm in due course.

    Finally, connect the tops of the two vertical lines to make a trapezoid.

Drafting the sleeve steps 2 and 3
  1. Divide the diagonal of the trapezoid into quarters, marking with crosses.

  2. From the lowest of the three crosses, draw a line at right angles to the diagonal down into the trapezoid, making its length 2.5cm / 1”. From the upper cross, draw a similiar line up out of the trapezoid.

Drafting the sleeve steps 4 and 5
  1. Draw a smooth curve that passes through all three crosses, making sure that it meets the left and right lines at right angles. This curve makes the sleeve more puffy by putting more material on the outer side of the arm and less on the inner side. Before going any further, measure this curve and make sure that it is longer than the combined armhole from the front and the back of the bodice (ignoring seam allowances). If it isn't, increase the factor of seven eighths you used for the bottom line, and start again. Alternatively, if you want more material at the top of your sleeve, slope the underarm line leftwards to allow you to draw a longer curve.

  2. Add a border that's the width of your seam allowance to the left side, and twice the height of your seam allowance to the bottom side (adding it twice here achieves the same effect as adding it to the curve, but is easier). Keeping the paper folded, cut along this border. Finally, clip a small triangle from the top of the middle crease - this marks where the sleeve will sit on your shoulder.

Figure 3.5: The finished sleeve pattern - unfolded, and folded for cutting

Drafting the sleeve band

Drafting the sleeve band
  1. Draw a rectangle whose horizontal side is your bicep circumference plus ease plus twice your seam allowance, and whose vertical side is 7.5cm / 3”. Although you can just draw this onto the fabric, the size of this piece lends itself to being slotted into gaps between larger ones, with a paper template making this process much easier.

Drafting the apron curve

Drafting the apron curve
  1. Measure in from the corner of your paper by 12.5cm / 5” in both directions, and mark a cross. Use this cross as the centre of a circle that just touches the edges of the paper. Cut along the resulting corner, keeping enough of the straight edges that come afterwards to allow them to be used for alignment.

Before you continue...

Figure 3.6: The finished pattern pieces for my husband's maid's dress and apron

You should now have five pattern pieces:

similar to those shown in Figure 3.6. Don't worry if yours have slightly different shapes or angles - the pattern you've drafted is intended to fit your body, not that of my husband!

In the next chapter, we'll use one of these pieces to make the first, and perhaps most important, part of your of maid's uniform - a frilly apron.